In "Minecraft" you can do a lot - this game practically does not limit you in your possibilities. You can build, craft items, brew potions, enchant weapons, and so on. Exploring the world, taming animals, fighting mobs and much more - all this is available to you in Minecraft. But at the same time, creative fans do not stop looking for new ways to expand the gameplay, so new modifications are constantly appearing on the network that expand the functionality, add new features and items - and even new worlds. How can you add something similar to your game? How to enable the mod in Minecraft? This is exactly what you will learn from this article.
Download mod
Naturally, if you want to know how to enable a mod in Minecraft, you need to start by finding the right files. You need to download them to your computer, which, in principle, is very simple to do if no protection is installed on the site. But most modders create for the public, so mods are completely free to distribute. So look for the mod you need, download it and get ready to learn the installation process, as well as how to enable the mod in Minecraft.
Minecraft.jar

The first thing you need to pay attention to is minecraft.jar. This archive will be key in your actions, since the modification is added there. The first thing you need to do is extract the contents, this is done using any archiver available to you. How to include the mod in "Minecraft" in this folder? Very simple - you need to copy all the files that you downloaded from the Internet and move them to the archive you just extracted. If the system asks you to replace duplicate files - confirm, this is necessary for the mods to work. When the copying process is complete, you will need to take care that minecraft.jar returns to the form of an archive. To do this, use the archiver again. After that, you can start the game - mods are added to Minecraft exclusively by software, you won’t have to activate anything else in the game itself.
Backup

Before making any changes to the minecraft.jar file, you need to make sure that you have a backup copy of it on your computer. This is quite a standard practice that is used everywhere, not only in computer games, but in all matters related to software. If something goes wrong during the installation of the mod, then you will not be able to manually return everything as it was. Then you can completely remove the corrupted version and return the backup, which will return everything to its original state. Therefore, never forget about it - it is a key point in installing any unofficial mod, add-on or extension.
Mod activation
It's time to figure out how to enable the mod. This question arises for many gamers who patched their client, but did not receive any changes. As already mentioned, no additional activation is required - you just need to launch the game and enjoy the process. If nothing has changed, then something has gone wrong. First of all, try deleting the META-INF folder, which often interferes with the normal activation of the mod. If this does not help, then you just need a backup copy. Try to remove the installed modification and, using a backup copy, install it again. Nothing succeeded? It means that something is wrong with the modification itself. You'd better try to download it from another site, preferably from the official page of the developer of this mod. Or contact technical support, if available.
Every real minecrafter has installed mods at least once, because they can add absolutely anything, the main thing is to choose the most interesting one. But the problem is that not everyone knows how to install them. That's why this guide was born: How to Install Mods in Minecraft !
Video guide:
The guide will be for versions and higher (1.6.*, 1.7.*, 1.8.* 1.9.* and so on), because before it was a little different.
(You can click on the pictures, they will take their full size)
1) Download and install if you are using something else. It is much better, you can read about the features on our website on the launcher page, for installing mods it is good because Forge (If you don’t know what it is, it will be described later in the article) can be installed in one click.
2) Choose the mod you want to install, we have a directory: . We remember which version of the game it was developed for, for example, we will have Plants Vs Zombies: Minecraft Warfare 1.7.10, that is, version 1.7.10.
3) We go into the launcher, and select the version of Forge (This is an intermediate mod that processes all others) under the version for which you have chosen the mod (In our case, Forge 1.7.10) and click "Install", then wait for the installation to complete and the first launch.

4) Next, we proceed to install the mod itself, for this, in the launcher, click on the "Open folder" button and a folder with all the game files will open.

5) Find the folder " mods"(It will appear by itself, if it is not there, then you have not installed Forge, but you can try to create it manually if you are sure that Forge is installed) and copy the mod file there, it will have a .jar or .zip extension (Perhaps it will be packed in .rar, which means you need to unpack it and transfer the file with the desired extension to a folder).

6) Run the desired Forge from the launcher again. To make sure that the mod works fine, in the main menu, press the mods button and see the new mod there:

Done, now you can play with the new mod! We hope you understand now how to install mod in minecraft!
Game modifications help World of Tanks players feel more comfortable in battle, find out their achievements right in battle, and also allow you to find out information about the enemy, his skill, and much more.
Where to install mods for World of Tanks
In order to use various game modifications that will definitely simplify some gameplay features and make the game more convenient, you must first install them in your game client.
Game modifications can be installed using special collections - the so-called "modpacks", which contain a large number of various modifications (from sights to player statistics). Also install individual mods with your own hands, without the help of these assemblies.
Installing individual mods mostly causes difficulties for players.
To install any game modification, you need to go to the folder with the game client, most often it is located at the following location D: / World of Tanks /. You need to find the /res_mods folder in it - it was created automatically so that players can install the necessary modifications on their own. Then you need to create a folder with the name of the current game patch (current version), for example, it will be /0. 9.13.
The final installation path will look like this: D /World of Tanks/res_mods/0. 9.13.
Installing most mods will be successful if you install in this way. However, some mods will require the creation of other folders, for example, some scopes will require the creation of additional folders in the /0 folder. 9.13.
To set the sight, you must create the /gui folder, then create the /scaleform folder in it. The final path should look like this:
D /World of Tanks/res_mods/0. 9.13.0/gui/scaleform
How to install the World of Tanks sound mod
A sound mod is a modification with which the player can change the existing sounds in the game. For example, completely change the voice acting of the crew, individual phrases when hit, and so on. Also, sound mods can add new voice acting elements, such as a crit bell (critical damage) of a module or an injured crew member.
Installation of such modifications is quite simple. To install sound mods, you must first download them from the site, the folder will often be called /audio. Then you need to go to the folder with the game client, and there we will also notice the same folder.
Then you should copy all the files from the downloaded /audio folder and paste it into the /audio folder of the game. It is necessary to copy with the replacement of current files, otherwise the mods will not work.
Before installing sound modifications, be sure to close the game client. In addition, you can not install a large number of sound mods, because they can lead to conflicts in the game, in some cases the game may not even start or be thrown out at startup. This applies not only to sound mods, but to everyone else.
What mods to install in World of Tanks
The most necessary for the players are the following game modifications:
Sights (the basic sight does not provide the required amount of information and can be replaced, for example, with a sight from Jove, which shows the reload time, zoom, the amount of tank durability, the presence of shells in the drum, and so on);
Graphical (this also includes "tank penetration skins" - a useful mod that shows vulnerabilities in tank armor, also mods like "white corpses" - helps to target enemies behind corpses, as well as "bright railway platforms", "white downed caterpillars”, “increasing the visibility range”);
Sound mods (new voice acting, lighting lamp voice acting, crit bell and many others);
Hangar modifications (a mod that completely changes the appearance of the player's hangar);
Player statistics mod, or the so-called "reindeer gauge" (allows you to find out information about the player - his percentage of wins, efficiency, as well as the number of fights);
These are the main mods, but there are many others that will improve your level of tank play.
Install mod pack for World of Tanks
Installing a mod pack is much easier than installing individual mods with your own hands. The developers of the mod pack have already put all the mods into one “heap”, which can be installed like a regular program / game, using the usual installer. All the player needs is just to choose the necessary ones from all the mods present.
On the Internet there are a large number of various mod packs from different developers. The most popular is the "Jov's Mod Pack", which contains a huge number of mods from many developers. In addition to "mods from Jova", you can also install mods from: Desertod, Maracasi or Amway921. Their number is large, so that everyone will find a selection to their taste and color.
In this article, I will go into great detail how to install minecraft mods, so if you want to diversify your minecraft with mods, but do not know how to install them in the game, then here is a great installation guide.
The guide is suitable for both the licensed version of minecraft and the pirated version, there is no difference.
What is needed to install mods on Minecraft?
Minecraft game one of the versions.Hands.
99% of modern mods are installed by copying the mod file into the Mods folder, but let's go through this in order:
At the moment, 98% of mods use a special mod loader called , and about 2% use .
Therefore, this article will be shown using the example of Minecraft Forge, it is installed in a completely similar way.
Let's install the mod:
Step 1.
Find out what version of the game you have, run the game and in the game menu you will see the version:Step 2
Great, let's say we have Minecraft 1.12.2, now we need (link), download it for minecraft 1.12.2.
There are 2 kinds of automatic installer, file installer as program .exe and installer file .jar, there is no difference between them at all, but for many players the .jar file opens as an archive, or stupidly does not start, therefore it is simply download the .exe installer and run it.
Installation example:

Step 3
Now open your minecraft launcher (the program that launches the game). It should contain a new version of Minecraft with the forge attribute:
Here is an example of two launchers:

We select the version of Minecraft with the addition of Forge, we launch it, if it starts, excellent, close the game immediately.
If it doesn’t start, you probably already have mods or mod files in the game folder that prevent the game from starting, you need to look at the error. Read about the reasons for not launching the game at the bottom of the news.
Step 4
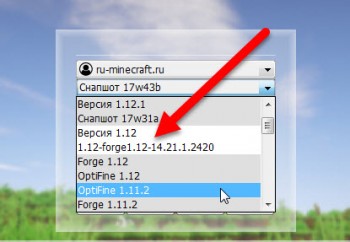
Now we need to select the desired mod for minecraft, the version of the mod must match the version of the game, i.e. mods for 1.12.2 are only suitable for 1.12.2, rarely (or if indicated) mods from 1.12 can fit version 1.12.1 or 1.12.2, try it.
Download the desired mod, also read the brief installation for each mod, in some cases there may be some additional steps.
Step 5
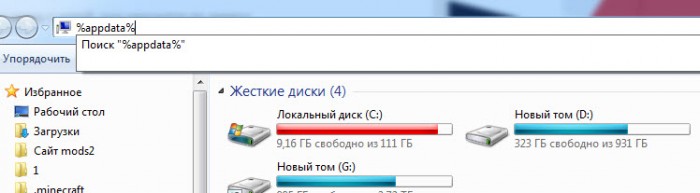
Just in any folder, type %appdata% in the address bar and press Enter:
Installing the mod in the game, first we need to get into the game folder, it is located at:
C:\Users\ Your_User\AppData\Roaming\.minecraft
If you cannot find the folder
Appdata:
You need to enable showing hidden folders and files.
Or press start - in the find field enter this:% APPDATA% and press enter, there you will find the .minecraft folder.
Or you can enter the combination Win + R on the keyboard (the Win button is a button between Ctrl and Alt on most keyboards, it has a Windows icon on it).
In the window that appears, enter% APPDATA% and press Enter there you will find the Roaming folder, and .minecraft in it.
Some launchers can change the name of this folder to something else, for example, .tlauncher
If you have Windows 10, then open the explorer, go to the "view" tab. Then click on the "show or hide" area and check the "hidden items" option. 
Next, you can find this folder where it should be.
Inside a folder .minecraft you will find a folder mods if it doesn't exist, create it.
Copy the downloaded mod file to the mods folder, run the game - the version of the game with the Forge signature.
Done, you are beautiful.
Possible problems and solutions:
Can't open Forge installer like forge-1.12.2-14.23.1.2556-installer.jarAnswer: download and install.
After installing some mods, the game does not start, crashes at startup without an error:
Answer:
This happens, there is a problematic mod, or one mod is not compatible with another mod, or some mod requires an additional mod to work. Look for incompatible mods by deleting mod files, update mods to more recent versions. (mod versions, not game versions).
Perhaps the mod requires additional libraries, usually the authors and those who post the news indicate the need to install additional mods, read the news with the mod in more detail.
It is extremely rare, but it happens that the version of the mod is not compatible with the new version of Forge, if the mod is old, you will probably have to find and install an older version of Forge.
You will probably have to stop using the problematic mod.
The game starts, but the message is displayed, there is no game menu.
Answer: As a rule, if a critical error has not occurred, then Minecraft Forge tries to report a possible reason, for example:
1) Some mod requires a more recent version of Minecraft Forge. (For example forge-1.12.2-14.23.1.2556-installer.jar - where 1.12.2 is the version of the game, 14.23.1.1.2556 is the version of the loader itself), you will probably have to install a more recent minecraft forge loader.
2) Some kind of mod requires an additional mod, it will be written there, mod name requires: name, you need to find this mod and drop it into mods.
3) You copied a mod for another version of the game into Mods, then it usually says that this mod requires a game version of such and such.
What to do if after installing Forge the game does not start, or does not start at all.
Answer:
Save your minecraft world, delete everything in the .minecraft folder, redownload the game version, and go through the installation of Forge again.
Or find another launcher for minecraft, similarly delete everything from the .minecraft folder, install the game with another launcher,
The world of Minecraft is beautiful and exciting, but with the addition of new modifications, the game will become much more interesting. Many may add new monsters or items to the game, as well as scripted objects that depend on the actions of the player. An example of interesting plugins can be one that adds a creepy monster to the game, or one that includes the crafting of new weapons.
General instructions for installing mods
1) First, find the folder with the game:
- On Seven and Vista, the game is located in the \AppData/Roaming\ folder.
- In XP - just in \Application Data\ .
2) Go to the bin folder and pay attention to the minecraft.jar file.
3) You need to reserve this file.
4) There are two ways to add files to minecraft.jar:
- Unzip it, while deleting the Java file, which will allow you to safely work with the folder where all the main content of the game is stored, without having to run the archiver every time.
- Open it with WinRar and modify files directly inside minecraft.jar.
5) In both cases, it will be necessary to delete the META-INF folder, the presence of which will not allow modifications to work, and the game itself too.
6) Copy the contents of the mod to minecraft.jar.
7) Launch the game and enjoy.
In order for the modifications to work properly, it is recommended to install AudioMod, which are installed in exactly the same way as any other mod. Versions of these programs have already been updated to 1.8.1 and are ready to work with the game. It is worth noting that packs with do not always work correctly with certain modifications, and sometimes because of this, various glitches can occur in the game, so it’s better not to install packs and mods at the same time.
Sometimes mods come across with a more detailed installation, for example, if you need to transfer files from the modification folder to the resourses folder in minecraft.jar. Typically, such mods are accompanied by Readme.txt, which specifies what and where to install. For less advanced users, mods are created in one archive containing the folders in the order required for it to work correctly. This will allow you to immediately unzip the modification in minecraft.jar and not bother installing it.
If you need to use mods on your own server, then you need to copy the modifications to the minecraft_server.jar file.
Before installing mods, consider the following factors:
- Be sure to find out if the mod being installed supports your version of the game - this information can be in the instructions attached to the files or in the Readme.txt in the archive with the modification.
- Modifications tend to fail with frequent upgrades. To prevent this from happening, it is recommended to install mods only on a clean game client that has not yet been modified.
- Texture packs can incorrectly affect the game with working modifications. Therefore, it is worth using only proven texture packs that can work in conjunction with installed mods.
- It often happens that mods simply refuse to work, so you need to install ModLoader, which will fix the game.
- If you have difficulty installing mods, try asking other users for help on